Showing posts with label Distress ink. Show all posts

Sunday, 3 April 2016

Fun Moments

Hi everyone, thanks for joining me...
Today I am sharing my latest work for Scrap FX... 
"Fun Moments"
these are a series of photo's I took of my nephew a few years ago now, I finally have got around to scrapping them.... he was such a cute kid.... now he is almost a teenager...
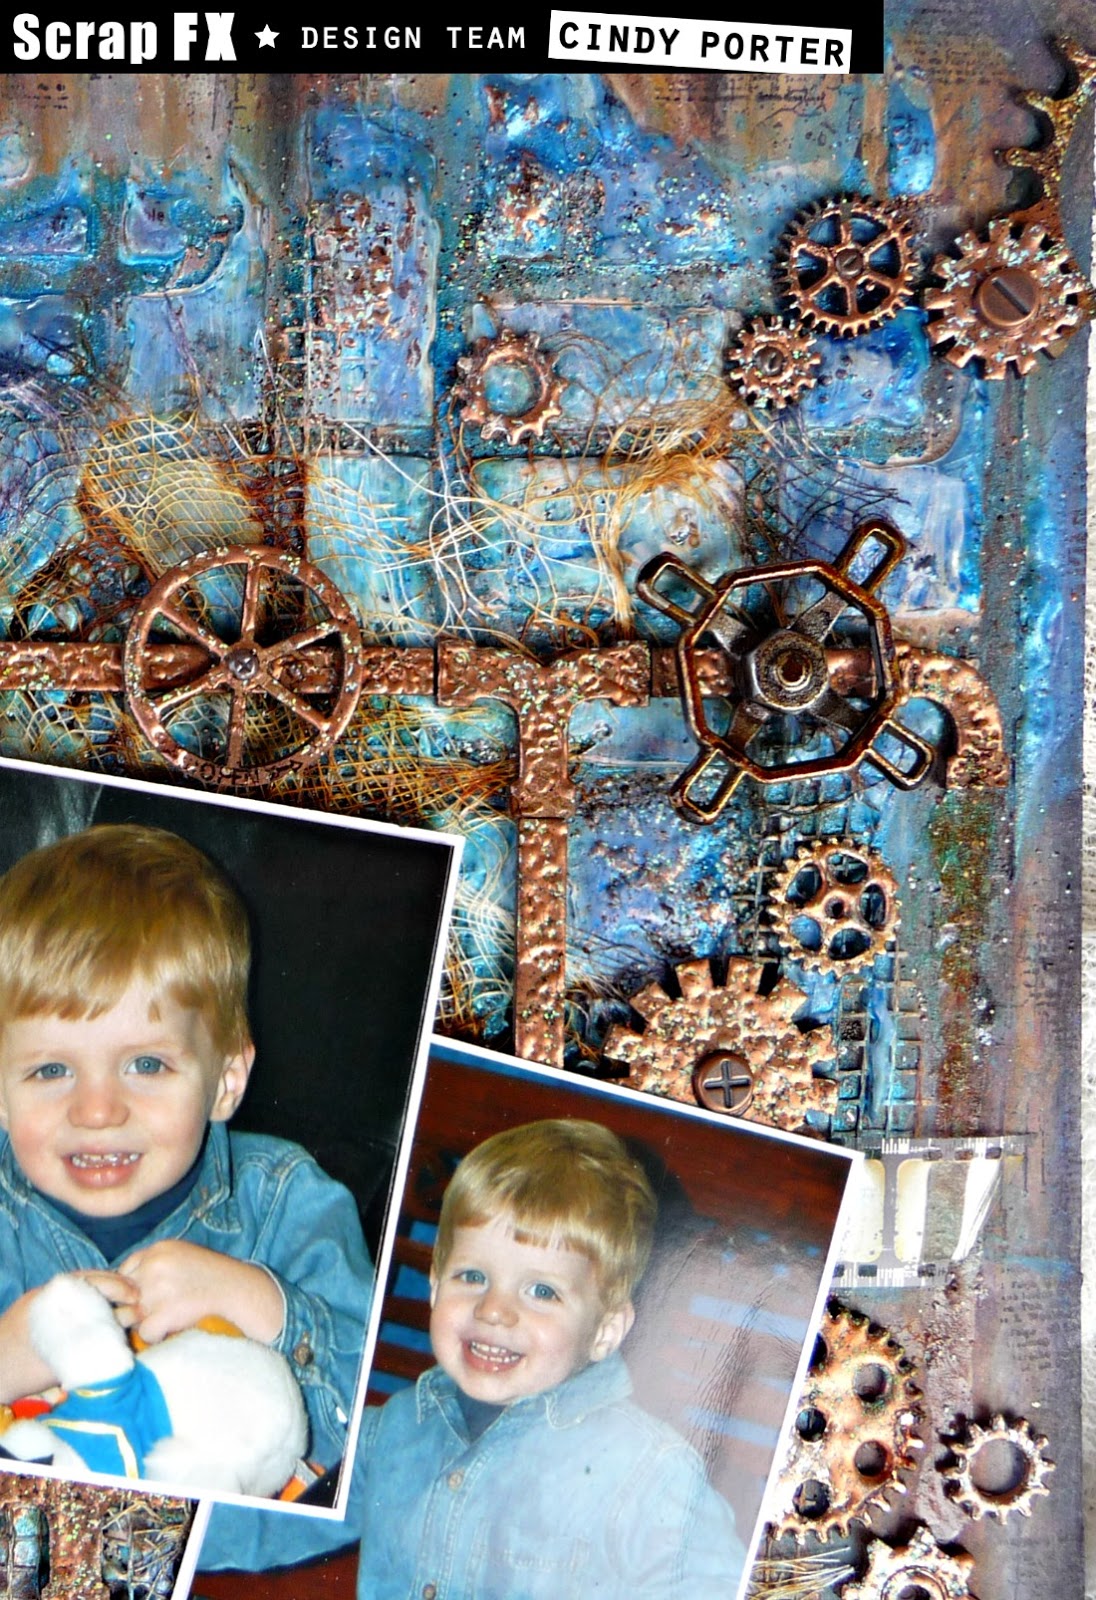
to create my background, I used the pipeworks stencil and modelling pasted added some colour, gauze, mesh tape and finally I sprinkled some embossing powder randomly over the stencilling ....

I used the leaky pipes chipboard set to embellish the layout.... I coated all the pieces with Stampendous aged embossing powder...
I also used the cogs pack and mini cogs pack, and embossed them in the same way...

I wanted to create a look of dripping and leaky pipes, so I added some Distress Ink re-inker to the page, the resin content gives the wet look to the layout, perfect to resemble rusty water drip marks...

 More of the cogs, coated in the aged embossing powders...


another close ups to show the background and pipe detail...

One last pic of the layout....

Scrap FX products used:


till next time
happy creating


Thursday, 21 January 2016

Phuket

Hi everyone, thanks for joining me here, today I'd like to share with you a piece I created for Scrap FX... "Phuket"

todays layout is sharing another pic from my visit to Tiger Kingdom in Phuket...

I created my background using the Abstract stencil with some modelling paste, loads of paint, and then finished with some acrylic ink in black and white....
 I had loads of fun getting messy with this background...

I used the Circle Mash Collage on this layout.... I cut it into two pieces to spread it out a little further...
I also used the Steampunk Transparency under the photo...

I added my favourite mini hearts from the Lots of Love pack....
 they are just so cute...

 finally I added my mini title.... "Phuket" this font was a special order... but if you love it, just ask Jill for Cindy's mini Phuket...

One last pic of the layout...

Scrap FX products used: 
till next time
happy creating and happy 2016
xC


Wednesday, 14 January 2015

A Good Day

Hi everyone, thanks for joining me here today for my second January post for D-lish Scraps, I'd like to share with you another layout .... "a good day"

the title says it all.... this was a good day... a little cold, but a good day... hubby and I had just finished the Grand Canyon Skywalk and we were exploring the Native American Village they have there at Eagle Point... 

I chose to use this flair button as my title, it just suited the photo so well...  it is from the "sweetly scripted kraft" set... I love this flair set, just full of great words...
Around my flair I wrapped a small amount of the blue/natural cotton twine and added a bitty bloom to the cluster... I layered some coloured tulle under the photo edge and added a Journal it's Library Card...

Here is a close up of the coloured tulle, and you can see how I stretched the edge of to make it appear torn.... I also added one of those fabulous Freckled Fawn paper clip arrow... I love these they just look fabulous and come in such awesome colours....

I used the Scrap FX nautilus shell (large) and painted it up with some magicals (Lindy's Stamp Gang)... isn't it a fabulous chipboard piece, I love it... 
And I have tucked another of the Journal it's Library Cards under the photo...

One final pic with a bit more of the coloured tulle, the blue/natural cotton twine and a couple of the bitty blooms to finish off the layout...

I'll be back again tomorrow for my final January post for D-lish Scraps... 

so till then

Happy Creating 
xC

Saturday, 13 December 2014

Love for D-lish Scraps

Hi everyone, thanks for joining me here today...
Today I'd like to share my latest for D-lish Scraps with you "Love"  
 I really enjoyed creating the earth tones challenge for the Cyber Crop this weekend, I decided to create another layout in earth tones.... this time I chose to use a couple of my Wedding photo's on a background of a gesso wash and Lindy's Stamp Gang sprays...

 I just love all those kraft flowers and vines Amanda now has....  Here I have used a cluster with a fern leaf and daisy flowers from the Kraft Expressions Range, along with a rose from the Vintage Roses Range and a flair button from Script words white set, which I coloured with some alcohol ink...

I also used love wood veneer frame, which I cut the frame off.... and then inked up with some distress ink... I used a quote strip from the Wordfetti everyday moments pack... You can also see more of the Kraft flowers from the Kraft Expressions Range..... 

 If you look really closely, tucked into these clusters.... you will find a few of the Metal Filigree flower centres, I love metal so couldn't resist adding a couple....  
I also used a couple of the Journal it's tickets ....

Once final pic to show off some of my background detail, created with the Scrap FX Petal flower stencil and some texture paste... but you could use any of the Scrap FX stencils to get this effect, as you are just creating random shapes and it's the thickness of the stencil that makes such great texture.... and we mustn't forget the paper doily  I coloured up and  tucked in behind my pics...

Don't forget the cybercrop is on this weekend over at The Scrap Suite, hope to see you all there, with loads of fun, inspiration, challenges and prizes to win...

till next time
Happy Creating
xC

Friday, 21 November 2014

Las Vegas .... a video tutorial

Hi everyone thanks for joining me here today....

Today I want to share with you all a little video tutorial I have created for Scrap FX.

I wanted to show how a stencil designed for one purpose can be used completely differently, if you just think outside of the box....

P1220214a
So I have gone ahead a made a layout tutorial using the new grungy wing stencil... but as you will see there is not a wing in sight on the completed layout...

P1220216a

P1220217a
   
Now, just before we get the the video, please bear in mind that this is my first video I am putting out there so I hope you all find it easy to watch..... I have to ask that there is no laughing out loud when you catch glimpses of my hugely fashionable crafting flanno, only smirks and sniggers are acceptable responses...lol... I must remember in future to roll up the sleeves...lol.... but we live and learn....

So now that the spiel is over here it finally is ...


Hope you enjoyed that... I'd love to here your thoughts on it or on what you might like to see as a tutorial in the future....

Scrap FX products used:


Till next time
Happy Creating
xC

Monday, 13 October 2014

D-lish Scraps

Hi everyone, thanks for joining me here today...
Today I'd like to share my first post for D-lish Scraps with you "Discover"
I am so excited and happy to be a part of this fantastic team...

 I created this layout using lots of the D-lish Scraps fabulous products...
I started with a black script page and used the Scrap FX map stencil to create background texture and then sprayed it up with loads of Lindy's Stamp Gang sprays...

I used the fabulous striped bags from D-lish to back my photo... I am quickly finding these are a go to product for me when creating...

 I used the wonderful coloured paper doilies, and applied some distress ink to the edges to give them some depth.... I love these doilies, no more spraying plain doilies and having them curl  and scrunch up as they dry, plus the added bonus no drying time... so awesome!!! 

I created a little embellishment cluster using the a flair button from the Life in Bokeh flair set and a metal filigree; filigree doily along with a journal it's from the Jumbo word tickets set, which I cut it out and inked up with distress ink...

I used one of the great arrow clips from the Freckled Fawn paper clips.... these are fantastic.... I hadn't used them before, but they have quickly become another favourite for me.... 

Finally for my title I used Scrap FX... apart from my love of D-lish, I do love my Scrap FX titles and stencils...

I have had a blast sharing my first D-lish creation with you all...

D-lish Products used:

Scrap FX Products used:

till next time
happy creating
xC

Wednesday, 13 August 2014

Scrapbookit August Challenge

Hi everyone, thanks for joining me here today.

It is my turn over on the Scrapbookit Blog today and I'd like to share with you the latest challenge that Jo has set for August and what a great challenge it is...


It is a game of Tic-Tac-Toe.
Here is the game board...

 
All you need to do is choose one line combination from the board - horizontal, vertical or diagonal and use those elements on your layout.

It's that easy!

I have chosen the Flowers - Ink/Paint - Black/White line.

Here is what I have come up with...

 So for my line of the challenge I used tiny flowers, Black/White tiny alphas that Jo had sent me in a previous kit, and Ink/Paint to colour my tree trunk.  This month we are all creating with the papers from the Pebbles Birthday Wishes Pack...

 A close up of the tree trunk I created on my page, using modelling paste and a Sculpey texture maker that Jo included in my kit.... how awesome is this texture  it created and so easy, I just pressed it into the modelling paste as it was drying....
I then coloured it with ink/paint...

 For my title I used Rainboots thickers and tiny letters from Kaisercraft....

I diecut some foliage from green cardstock and added a little gauze threads to my flower cluster....

I hope you'll join in the fun and play along the challenge. Entries need to be in by 30th August to be in the running for a massive prize pack from Jo, so hit your stash or purchase something new from Jo to play with....

till next time
Happy Creating
xC


Tuesday, 27 May 2014

Scrapbookit

Hi everyone, thanks for joining me here today.
It's my turn today again over on the Scrapbookit blog and I'd like to share with you the layout I have created "happiness".


 I created this layout using more of the fabulous My Minds Eye Chalk Studio range.... this  time I only used some of the words to create my title and  I used coordinations cardstock  to create the layout....

this month Jo also sent me some little frames that coordinate with the chalk studio range.... My photo was way too big to fit into any of the little frames, so I cut one of the frames diagonally from corner to corner and created a little mat for my photo to sit on... In my pack this month was also some great diamante trim, which I added to one side of the photo...

I folded the extra large silk flowers in half and used them under the photo and title... My background was created using a couple of the Tim Holtz tag stencils with distress ink, and using a wire tool to scratch the Coordinations cardstock... remember that Coordinations cardstock has another colour in the core that is revealed when sanded or in this case scratched... although in this photo the core looks white, it is actually a very, very soft pink...

don't forget to get your challenge entries in for your chance to win, I'm looking forward to seeing them all...


till next time
Happy Creating
xC