Tuesday, 22 August 2017

Lace Feathers with Primary Elements Arte Pigments

Hi everyone just wanted to share with you all a video I created for ColourArte....
using the Primary Elements Arte Pigments in the silicone shallow moulds...


Here's my video demonstration on how to make them...


Hope you enjoyed this video... thanks for watching...


till next time
Happy Creating


xC


The Ancient City

Hi everyone, today I'm sharing my latest layout for Scrap FX, The Anceint City, using some of this months new releases...
 Loved the gondolas in Venice. This is my favourite picture, I love it.

The new title, The Ancient City was a perfect fit for this layout....  painted up with True Silver.

I used the new Rolling Waves on top of the new Yacht Stencil (you can only see the water ripples behind all the photo and embellishments)

For the background I added the Moroccan Tile Stencil and Scribbled Script Stencils ...And I also added some medium chicken wire, painted up with some True Silver.

One final look at the full layout.

till next time
Happy Creating
xC


Monday, 21 August 2017

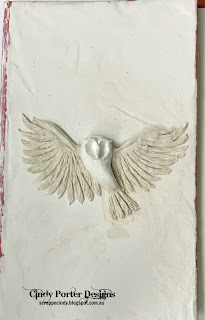
Owl Journal Cover with Creative Paperclay®

Hi Creative Paperclay® fans, it's Cindy here, I am excited to share with you my latest project, An Owl Journal Cover.... 

keep reading to see how to create your own...


Supplies:
Clay shaping tools
Rolling pin
Water for smoothing clay


Directions:
I began by removing all the pages from a hard cover book...


I then rolled out some Creative Paperclay®...

and applied it to the front of the book cover...

Next I started to make the owl.... I began with the body, making a sort of tear drop shape...

and then applied it to the book cover, then press down slightly with your thumb on the head area...

Next make a flat oval piece and attach to the thumb spot on the head... this is the beginning of your owl's face...

then using a ball tool (or end of a paint brush), create two eye cavities...

Now add a beak ridge and some eyebrows...

Now it's starting to look a bit like the beginning of an owl...

time for the wings... begin making the shapes of form the wing structure and then the feathers... make lots of feathers....

put down the wing structures first to decide the wing positions, and then add the individual feathers as shown below...  don't forget to mark up the feathers to make them look realistic...

Now create the tail using more of the feathers you made...

time to sculpt some little 3D claws...

and attach them along with some tiny balls of clay to form the eyes....
I also used my ball tool to create the pupils in those little clay ball eyes, and speckles on my owl...

So now my owl is completed and ready to paint... but I decided that the plain book cover wasn't what I wanted after all... so stay tuned for my next post and see what I do to finish it off...

thank you for stopping by and joining me here today,


Till next time
Happy Creating
xC


Saturday, 12 August 2017

Adventure

Hi everyone,  today I'm sharing my latest layout for Scrap FX,  Adventure, using some of this months new releases...

  This is a picture I took while I was Hot Air Ballooning over Melbourne... all I can say is it was magical... 

  I chose the new adventure arrow for my title, just love these new arrow titles in the latest release...


 For my background I use the cool circles stencil with some modelling paste for texture, before paint and inking it up...

   
 I added the new Compass Aim and the Mercator  Flourish after painting them up with some Vivid Ultra Metallic paint...

   
 I also used the Feather stamps and stamped them onto watercolour paper, then stamped the Chicken Wire Stamp over them, before adding them to my layout...

   
 To finish my layout off I used the Chicken Wire Stamp around the edge of my layout along with a small text stamp...

   
 A final look at the layout...   

 till next time 
 Happy Creating 
 xC

Wednesday, 2 August 2017

Creative Paperclay® Tool Holder

Hi Creative Paperclay® fans, it's Cindy here, I am excited to share with you my tip for August on how to create your own tool holder for your clay working tools, keep reading to see how to create your own...


For the how to... I created a little video...


thank you for stopping by and joining me here today


Till next time

Happy Creating

xC