Tuesday, 26 November 2013

Scrap FX mood board challenge

Hi today I want to share with you what I created for the latest mood board challenge over at Scrap FX...

But before I do, here is the mood board again and all the deets of the challenge for our chance to win ...
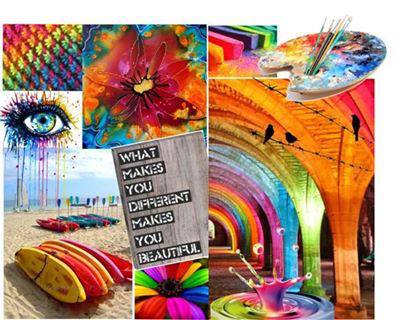
So fun, right??! The boinging rainbow colors can lead to endless creations, plus there are numerous images to be inspired by as well! You may choose to take the quote and run with text, or perhaps some of the patterns speak to you, or maybe even the eye pops out as a starting point for something magnificent. Upload your newly created project to our Facebook page here or leave a blog link on the ScrapFX blog here if you don’t do Facebook (you are more than welcome to do both) so we can check it out. 

 Deadline: Friday, December 13, 2013 for your chance to win! 

DT Challenge: Use Mood Board as inspiration to create a project of any type and use stencils in the creation of project

So without further delay here is the canvas I created for the challenge....
 As you can see I used all the colours of the rainbow, the fabulous Lindy's Stamp Gang sprays.... and I had been dying to create a project using the "You colour my world" title.... this seemed like the perfect opportunity...

Here you can see where I used the Random Dot Stencil around the left/bottom edge of the canvas for some added texture...

I used the Moroccan Tile stencil on the top/right of the canvas to create plenty of texture for my rainbow colours.... I have used the Scrap FX barbed wire strands to help finish off this canvas, they are great for male inspired creations ...

 Finally I had been wanting to use the new "paper tree black" and it just went so well on this canvas..... such fine detail.... love it!!

Here's what I used to create this project:
Scrap FX:

Lindy's Stamp Gang:
Jack in the Pulpit Teal
Tiger Lily Red Orange
Witch's Potion Purple
Afternoon Delight Denim

Delphinium Turquoise
California Poppy Gold
Rudolph's Nose Red

Well thanks for stopping by, I hope I've help inspire you to have a go at your own rainbow creation and I look forward to seeing what you create...

till next time 
happy creating
xC

Sunday, 17 November 2013

Scrapbookit DT....yay!!

I'm very excited to be able to share with you all my first creations for Scrapbookit....
First up I have a layout "Red Rock Canyon" 
I created this layout using the Graphic 45  Typography collection, now who doesn't love Graphic 45.... along with the Graphic 45 I used some fantastic Scrap FX products (Chevron Stencil, chicken wire, Elm leaf stamp) I love the Scrap FX chicken wire, so many uses.... 

 I also used a distress stain to create all the splats and drips on the layout, as well as to colour the corrugated cardboard and chicken wire.... I finished the layout off with some Kaiser lettering and by altering some of the flowers available from Scrapbookit....

Next up I have an altered project to share...
an alarm clock I altered using more of the Graphic 45 Typography collection, and more of the Scrapbookit flowers, along with some cogs cut from black cardstock


  add to this a Scrap FX "moments" mini word to finish it off 

Well I hope you've enjoyed these projects and are feeling inspired to create some of your own...
thanks for stopping by and remember you can find all these products over at Scrapbookit
Till next time,
Happy Creating
xC

Wednesday, 6 November 2013

New Scrap FX fun...

Hi just wanting to share with you my latest creations with the new Scrap FX releases....
Scrap FX have outdone themselves this month with their new stencils and stamps and of course chippies... so much to choose from I didn't know where to start.... You can check out all the new releases here...

First up I have "Ancient Ruins"  (no snickering about the relevance of the title to my pic either, lol)...
I just loved the new Brick Frame and thought it worked perfectly with the brick wall in my image, and I couldn't resist the gorgeous new Moroccan Tile Stencil... a new fav!
Add to this one of the fantastic new Leaves Stamps and the cute new Words Sets ....


 some close ups of all the detail:
Moroccan Tile Stencil


The Scrap FX products I used to create this layout:


Next up I have another layout to share "Celebrate" 

Here I have used the new Squares and Circles Stencil, it creates a great random pattern

A close up of the embossed Ruffled Feather Stamp (one of my all time fav's, it creates great texture and patterns, so versatile for any project)  You can also see the Flower Posy Stamp, and the Flourish Curl Border
 The Scrap FX products I used to create this layout:

Well I hope you've enjoyed these layouts, 
thanks for stopping by,
Till next time,
Happy Creating
xC

Saturday, 26 October 2013

The Latest Scrap FX Mood Board Challenge

So this months challenge is up on the Scrap FX blog.... this month we have a mood  board and sketch for you to create with...

First up the board, prepared by the lovely Claire:
MoodBoardOctober
A bit more masculine in nature this time and neutral in tone. Perfect to go with all the chippies released this month to showcase the guys in our life, but it can also hold other potential with items from nature being present, organic patterns, the possibilities are truly endless with mood boards. All you need is a little creative juice.

Now the sketch:
MoodBoardSketch
A splendid sketch to play with – right? The fantabulous Claire a.k.a Luckie created this beauty also! She is uber talented don’t you think?!

so here is the DT Challenge:
Use the mood board as inspiration to create any type of project
The sketch must be used in the creation of project


So here is my take on the challenge.... 
I first created a layout just following the sketch, but wasn't happy with the result, a little to neat and simple for my usual style.... so I had another think about it and another look at the sketch... and this is what I came up with...

I started with an oversized spoon as my base....

and proceed to create a mini version of the sketch upon the spoon....
I know a little out there, but haven't you ever just wanted to alter everything insight???... 
This is the phase I am going through right now...

I used the Scrap FX  Retro Flourish Frame as my base for the design, used a small doily to fill the void of the frame, and built the sketch from there...
I used the Hexangonal Pattern Stencil on a piece of book page, to tone everything back to the mood board... I then finished the design off with the "love" title from the Scrap FX Words of Love and added some roses, ribbons and trim....


the Scrap FX pieces used to create my altered spoon:


Well I hope that you liked my twist on the latest challenge... and I hope to see you sharing your take on the challenge over on the Scrap FX facebook page....

till next time
happy creating
xC

Thursday, 17 October 2013

Altered Fun

Hi everyone, thought you might like to see an altered project that I have been working on... a storage rack for my favourite edge punches


I had started with an old spice rack that had been given to me by a good friend
I added a coat of gesso (I did remove the bars, before getting gesso on them, just not before I started, lol)

I then added pieces of sheet music

next I added some dimension with the Random Dots stencil and then inked it up with distress ink

then I added a splash of colour with Lindys Stamp Gang spray


I painted the bars and reattached them and then sealed the rack, it is important to seal a project like this to protect it, as it will be used regularly

 then to finish it off added some decoration with Scrap FX and some flowers


I hope you liked the project

Scrap FX products used:

I'd love to hear your thoughts on this project,
till next time
happy creating
xC


Monday, 7 October 2013

So Exciting!

Just had to share my excitement....


My "Create" canvas, the one I had created for the Scrap FX challenge was featured on the Lindy's Stamp Gang Blog.... you can check it out here >>> http://ow.ly/pxxFy

 some close ups


Here's a link to my original post about this project.... http://ow.ly/re6yN

It's just so exciting to have my work up on their blog.

just had to share my excitement
till next time
Happy Creating
xC

Thursday, 3 October 2013

Creating Backgrounds with Scrap FX


 Hi today I want to share with you a couple of layouts I created using the latest Scrap FX stamps...  If you haven't tried their stamps you should, they are fantastic! (and not to mention so affordable)...
I love creating interesting backgrounds for my layouts using these new stamps...


First up to share I have "Moments to Remember"  


For this layout I started with plain grey cardstock and the new Scrap FX Cogs stamp (it's awesome)... added Gesso, both black and white, some pieces of book pages, and finally some distress ink....


The title was painted with Precious Metal Colour paint from Viva Decor,  as well as the Steampunk Flourish Border and the Chicken Wire was painted with black Gesso.


Scrap FX products used to create this layout:
Cog Stamp: Model: 2013284


 Next up I have another layout to share "The Vatican"


For this layout, I used the new Clock Face Stamp... another new favourite of mine.... problem is I have too many favourites now!! lol...
I stamped this layout using black Gesso... and the great thing about these stamps is that they, hold so much ink or paint that you can stamp multiple times without reapplication.... hence the shades of the clock faces on my background... 


Here I used the String Beads Stencil for some great texture...


And finally I fussy cut some distress ink stamped images of the Leafy Stem Stamp...
Scrap FX products used to create this layout:

Well I hope that these will help inspire you to try the Scrap FX stamps if you haven't already.

till next time
happy creating
xC

Tuesday, 1 October 2013

School holiday fun with Helmar


Hi I was asked by Helmar to do something school holiday related this month for my DT project... so here are the projects I came up with, suitable for a wide age range and hopefully will keep the kids entertained for a while..... 

a pen holder & matching notebook


these are a couple of simple projects that can be achieve by most age groups....


this was a little glass jar I found for 50c at my local 2nd hand store, but you could also use an empty vegemite or jam jar if you have them
you can collect some cheap button packs from some of the large craft stores or sometimes from the 2nd hand stores too


Using Helmar 450 Quick Dry Adhesive apply a dob of glue to each button and  randomly stick them onto the jar until you are happy with the coverage. Once the glue has set it's ready for them to use...

follow the same procedure to create a matching notebook (you can pick up notebooks from any of the cheap shops)... as a fun addition you can add your child's initials to the cover with chipboard letters...


I find that this is great for the youngsters, but if you have older children you can take the project a couple of steps further...

paint over the whole surface with Gesso...

 for the notebook it is best to remove the covers for painting... Note you should leave the covers on for the button gluing to ensure that the children don't stick buttons over the binding holes...

Next using some colour sprays.... Lindys Stamp Gang, glimmermists or similar... spray a few colours all over the projects


finally spray your projects with Krystal Kote Gloss Varnish to seal the colour...

hope you enjoyed the projects,
till next time
happy creating
xC